
Better Kubernetes YAML Editing with (Neo)vim
Introduction
If you work as a DevOps or platform engineer, you probably have a love-hate relationship with YAML. It’s essential for configuring modern cloud infrastructure but can be a hassle to manage. Neovim, a modern take on Vim, offers a powerful way to handle YAML files more efficiently. It’s lightweight, integrates seamlessly with the terminal, and is highly customizable.
In this blog, we’ll explore how to set up Neovim to make working with YAML files easier and less error-prone. Whether you’re new to Neovim or a seasoned user, this guide will help you streamline your YAML editing workflow.
Setting Up Neovim for YAML
Before diving into specific configurations, it’s crucial to ensure Neovim is set as your default editor. This ensures that any command-line operation that requires an editor will automatically use Neovim.
System Integration
Set Neovim as Default Editor: Add the following line to your .bashrc or .zshrc file:
export EDITOR=nvimThis sets Neovim as the default editor for various command-line operations.
Git Integration: Set Neovim as the default editor for Git commit messages by running:
git config --global core.editor "nvim"Initial Configuration
To get started with a robust Neovim setup, I recommend using the kickstart.nvim repository. It offers a well-documented init.lua file that provides sensible defaults and explains each setting in detail. This will save you time and help you get up and running quickly with good defaults.
git clone https://github.com/nvim-lua/kickstart.nvim.git ~/.config/nvimYAML-specific Settings
To make Neovim more effective for editing YAML files, we need to set up some configurations that are specific to this file type. These settings will help with indentation, folding, linting, and autocompletion.
Create a file named yaml.lua in the ftplugin directory within your Neovim configuration folder (~/.config/nvim/ftplugin/yaml.lua). We will put the configuration here and it will be available for every *.yaml file.
Basic Settings
-- Basic Settings
vim.opt_local.cursorcolumn = true -- Highlight the current column
vim.opt_local.shiftwidth = 2 -- Number of spaces to use for each step of (auto)indent
vim.opt_local.softtabstop = 2 -- Number of spaces that a <Tab> counts for while performing editing operations
vim.opt_local.tabstop = 2 -- Number of spaces that a <Tab> in the file counts for
vim.opt_local.expandtab = true -- Expand tab to 2 spaces
These settings ensure that your YAML files use spaces instead of tabs and maintain a consistent indentation level.
Key Bindings
Adding some key bindings can significantly improve your efficiency when working with YAML files. Here are a couple of useful key bindings for linting and using Telescope to navigate YAML files:
-- Helpers
vim.api.nvim_buf_set_keymap(0, "n", "<leader>yt", ":YAMLTelescope<CR>", { noremap = false })
vim.api.nvim_buf_set_keymap(0, "n", "<leader>yl", ":!yamllint %<CR>", { noremap = true, silent = true })<leader>yt: Opens a Telescope extension for YAML.<leader>yl: Runsyamllinton the current file to check for syntax errors.
Learn how to use external commands with Neo(vim) in my recent blog.
Pasting YAML stanzas in a normal way using the put command (paste) is problematic because it doesn’t respect the indentation, and we often need to realign the pasted stanza with >.
To fix this issue, use ]p and [p respectively to paste the stanza below or above the current line with the same indentation as the current line. Here is the excerpt from vim help.
["x]]p      or     *]p* *]<MiddleMouse>*
["x]]<MiddleMouse> Like "p", but adjust the indent to the current line.
   Using the mouse only works when 'mouse' contains 'n'
   or 'a'.

["x][P      or     *[P*
["x]]P      or     *]P*
["x][p      or     *[p* *[<MiddleMouse>*
["x][<MiddleMouse> Like "P", but adjust the indent to the current line.
   Using the mouse only works when 'mouse' contains 'n'
   or 'a'.
Folding & Internation
YAML is indentation-based, we can take advantage of this and set folding settings to collapse file chunks on the indentation lines.
Folding allows to collapse and expand sections of your YAML files, making it easier to navigate large files:
-- Folding
vim.opt_local.foldmethod = "indent"
vim.opt_local.foldlevel = 1
vim.api.nvim_buf_set_keymap(0, "n", "zj", ':lua NavigateFold("j")<CR>', { noremap = true, silent = true })
vim.api.nvim_buf_set_keymap(0, "n", "zk", ':lua NavigateFold("k")<CR>', { noremap = true, silent = true })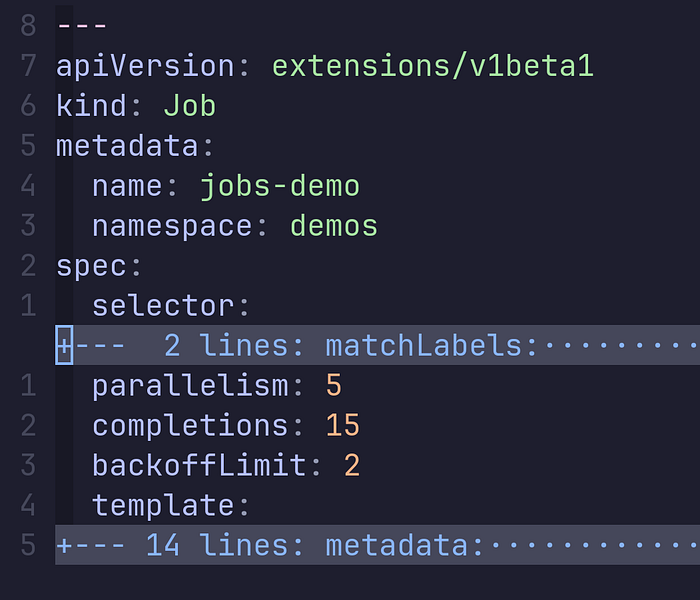
zjandzk: Custom functions to navigate between folds.
Here is the custom lua function that implements this:
function _G.NavigateFold(direction)
  local cmd = "normal! " .. direction
  local view = vim.fn.winsaveview()
  local lnum = view.lnum
  local new_lnum = lnum
  local open = true

  while lnum == new_lnum or open do
    vim.cmd(cmd)
    new_lnum = vim.fn.line "."
    open = vim.fn.foldclosed(new_lnum) < 0
  end

  if open then
    vim.fn.winrestview(view)
  end
end
Other fold shortcuts for reference:
za: Toggle fold under cursor
zA: Toggle all folds under cursor
zc: Close fold under cursor
zC: Close all folds under cursor
zd: Delete fold under cursor
zD: Delete all folds in file
zf: Create fold
zo: Open fold under cursor
zO: Open all folds under cursor
zm: Fold more (close more folds)
zM: Close all folds
zr: Fold less (open more folds)
zR: Open all folds
zx: Update folds
zX: Reapply folds
LSP Configuration
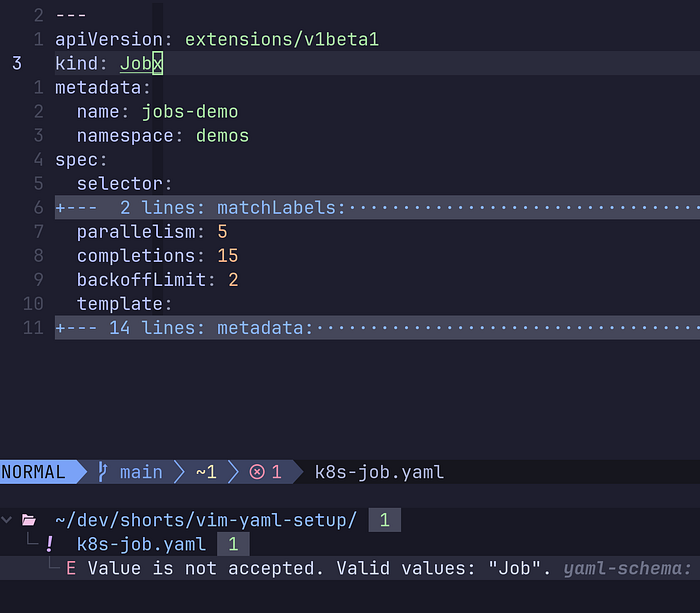
Setting up the Language Server Protocol (LSP) for YAML files provides features like autocompletion, go-to definition, and linting:
-- LSP Configuration
require("lspconfig").yamlls.setup {
  settings = {
    yaml = {
      schemas = {
        kubernetes = "k8s-*.yaml",
        ["http://json.schemastore.org/github-workflow"] = ".github/workflows/*",
        ["http://json.schemastore.org/github-action"] = ".github/action.{yml,yaml}",
        ["http://json.schemastore.org/ansible-stable-2.9"] = "roles/tasks/**/*.{yml,yaml}",
        ["http://json.schemastore.org/prettierrc"] = ".prettierrc.{yml,yaml}",
        ["http://json.schemastore.org/kustomization"] = "kustomization.{yml,yaml}",
        ["http://json.schemastore.org/chart"] = "Chart.{yml,yaml}",
        ["http://json.schemastore.org/circleciconfig"] = ".circleci/**/*.{yml,yaml}",
      },
    },
  },
}
This configuration sets up schema validation for various types of YAML files, providing intelligent autocompletion and error checking based on the context of the file.
Autocompletion
To enhance autocompletion, we use the nvim-cmp plugin, which integrates with the LSP for more advanced completions:
-- Autocompletion
local cmp = require "cmp"
cmp.setup.buffer {
  sources = {
    { name = "vsnip" },
    { name = "nvim_lsp" },
    { name = "path" },
    {
      name = "buffer",
      option = {
        get_bufnrs = function()
          local bufs = {}
          for _, win in ipairs(vim.api.nvim_list_wins()) do
            bufs[vim.api.nvim_win_get_buf(win)] = true
          end
          return vim.tbl_keys(bufs)
        end,
      },
    },
  },
}
This setup allows for snippet completions, LSP-based completions, file path completions, and buffer-based completions.

Closing Thoughts
YAML is great… when we need to read it. Not so much when you need to write lots of it. Editing YAML files by hand should be a last resort. If you can take advantage of tools that generate YAML files, for example for Kubernetes or GitHub Actions. However, if you find yourself needing to edit files or sift through them; Neo(vim) can be a solid choice.
We have seen how it enhanced productivity and reduced errors when working with YAML files. Here are a few resources used in the blog and video.
- nvim documentation: https://neovim.io/doc/
- slides from the presentation: https://github.com/Piotr1215/shorts/blob/main/vim-yaml-setup/slides.md
- yaml.lua from my dotfiles: https://github.com/Piotr1215/dotfiles/blob/master/.config/nvim/ftplugin/yaml.lua
- kickstart.nvim: https://github.com/nvim-lua/kickstart.nvim
Give these a shot, play around with your setup, and see how Neovim can transform your YAML editing experience.
Thanks for taking the time to read this post. I hope you found it interesting and informative.
🔗 Connect with me on LinkedIn
🌐 Visit my Website
📺 Subscribe to my YouTube Channel

